


It’s been a sanding-and-refinishing-floors kind of week here at the Ziehm house. There’s never a good time, but sometimes you just have to dive in and do it if you are ever going to get ahead.
I live in the village of Greenwich, in the old church rectory. I bought our home almost 7 years ago. A work in progress, it has definitely been a labor of love.
I felt lucky: the plaster walls were in good shape; however, every stitch of wall space was donned with wallpaper 3 layers thick in some rooms.
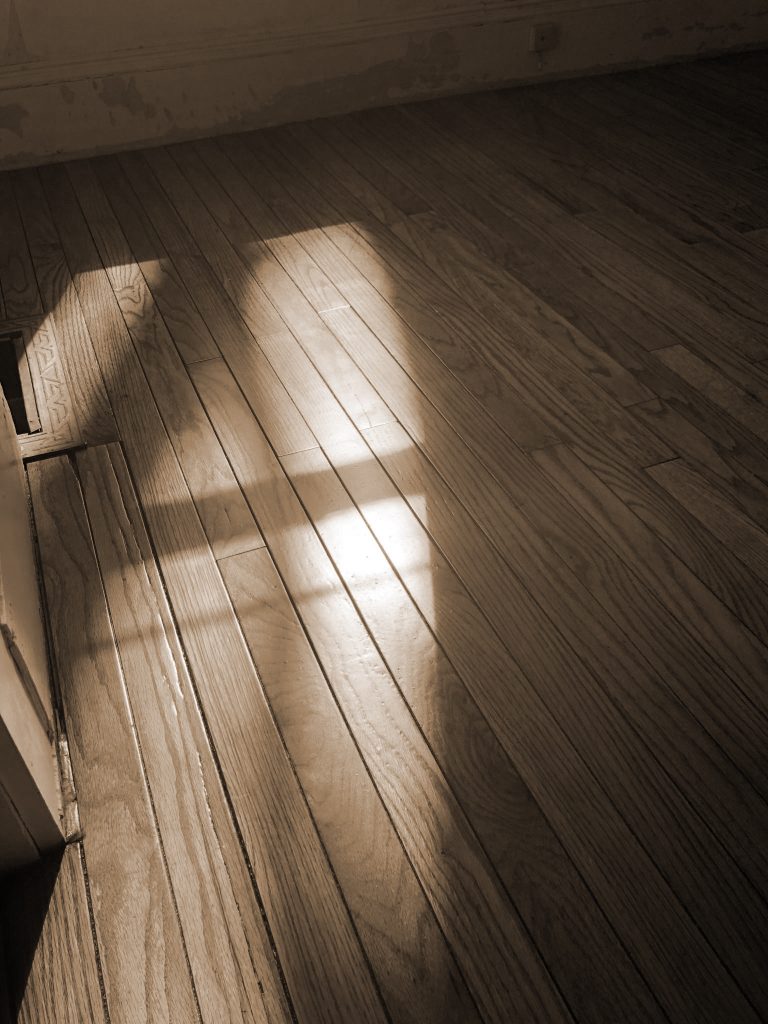
And then, there are my hardwood floors … all of them in dire need of attention.
One of my dearest friends, Kim, has helped me go through the entire downstairs, room by room, redoing the floors.
Kim has been working on hardwood floors her entire life, laboring over their beauty like a timeless masterpiece. She is a floor perfectionist and has taught me well.
With her years of experience, and my quick-learning, no-cutting corners personality, we make a good team. We laugh and say if all else fails in our professional lives, we could always take our show on the road and rake in the money, one floor at a time.
It’s an art, sanding and refinishing hardwood floors. It goes much deeper though than the simple work of it. It’s about working with what you have, creating a vision, and going after it through hard work and determination. I find that the skills used to breathe life back into an old hardwood floor can apply to the situations and patterns of our own lives.
YOU MUST start at the beginning when embarking on a floor, taking it back before you can bring it forward.
We had a few carpets and linoleum to lift up first, so I didn’t know exactly what was underneath … if anything. I guess that’s where the adventure comes in. We ended up uncovering some treasures, like quarter-sawn maple, with a pattern to it, but it needed lots of work to bring it back.
The tearing up is never fun. It’s messy, labor intensive, and, at times, makes you feel self-defeating before you even get to what lies beneath. However, like most things in life, you must put some sweat into it. What you discover underneath will determine the number of gallons (of sweat) you actually go through.
Are you dealing with sticky glue, or paint, or maybe really old shellac? One way or another, it has to come off, before you can begin.
Set up. Renting the sander, and gathering all of the tools and materials, seems to take forever, never allowing you to start as early as you want to on day one. No matter how many lists are made, there always seems to be one more extension cord that is needed, or a rougher grit of sandpaper that needs to be bought. Laying the groundwork in any project is extremely important. It’s like the cornerstones of a building–literally and figuratively.
Prepare yourself. Old clothes and footwear. Check. Facemask fitted and pulled over mouth and nose. Check. Knee pads in place. Check. Music and food. Double check. You don’t want to go into the project uncomfortable, or unprepared. You will only deplete your stamina for all of the hard work. You want to do everything you can to stay strong and ready for any bump in the road, or floor, that you might stumble upon.
Start. When the first switch is thrown, the humming begins, and the dust starts to fill the air, the feeling of productivity permeates the room, and nothing but the task at hand consumes your thoughts. It’s a good focus because it clears your mind of everything else that is bumping around in there. I find it quite refreshing and therapeutic.
Settle in. Each layer of finish begins to come off, and you start to burn through the low grit. You dig in with each changed sheet of sandpaper, calculating in your mind if this project is really going to come in close to budget. Is that glue ever going to come off and quit gumming things up? Why did I ever decide to create this chaos? Weren’t things running okay to begin with? Always time to second guess … but there is never any turning back. You might as well just settle in and get it done.
Do the work. Down on my knees I go (praying), palm sanding my way around the edges of the room, running into an occasional raised nail or old staple left from the carpet before. Sand, scrutinize, feel … sand again. The cycle repeats over and over. Heavy sigh, sit back on the heels, begin again, go the distance.
Assess. Look over the whole project, and figure the progress. A conference with the work crew, we may change our tactics depending upon what the floor is asking of us. Like any new project or phase in life, you must take time to sit back and just look, recalculate if necessary, many, many times over.
Progress. Like a lifting of the fog, with each layer gone, the floor gets lighter. Every pass, letting go of the drudgery from years of wear and tear. The floor feels that a new chapter is about to begin, and the excitement of what is being uncovered starts to fill the minds of all at work. Hope.
Vacuum, vacuum, vacuum. We can now begin tacking. Clean thoroughly. Tacking of the mineral spirits prepares the surface for what it is about to receive, lifting the fibers of the wood that are thirsty for moisture and anxious to be quenched, after so many long years of drought, withstanding the test of time. Like the hardwood floor, sometimes we are more than ready to drink again, facilitating a shift or change.
Coat 1: For our base coat, a mix of mineral spirits and high gloss polyurethane. Do not skimp, or you will be going back. We must insure the wood fibers integrity at the very base. And this will do it.
Dry. Wait patiently.
Sand again using a finer grain paper. Vacuum, tack.
Down on my hands and knees I go again, cutting in the edges. I look for every possible hair, or fleck of white paint that has jumped off the wall in hopes of spoiling my nicely prepared surface. There is always a spoiler. Missing those particles means you will be staring at them for a very long time. If you decide to ignore their presence, all those little particles will add up to make one mediocre piece of work. I call it a sign of laziness … which will never yield you the standard of the goal you have in mind … beauty, strength, and functionality.
Coat 2: Straight high gloss polyurethane–whether you want the final finish to be high gloss or not, you must insure that your foundation layers are built on the highest durability to withstand the wear and tear of everyday use. It’s like building a house with oak instead of pine. If your foundation is strong, it will weather the ups and downs and forces of nature that will try to attack it’s integrity every day.
Dry. Wait patiently.
Sand again with a higher grain sandpaper. Vacuum, tack.
Coat 3: Another layer of high gloss polyurethane. As you build, your foundation gets stronger and stronger. Pay attention to details: flecks, hairs, bugs. Remove as you go, you don’t want anything to tarnish your work.
Dry. Wait patiently.
Palm sand with your finest grit, feel. Wax on, wax off, wax on, wax off. Don’t quit now. Vacuum, tack.
Final coat: I like a satin finish. Go careful, go slow, extra scrutiny from the board of directors looking for misses. Be patient, thorough, slow, and deliberate. Make long graceful strokes to eliminate pooling of product. Taking time now will pay dividends in the future.
Dry. Wait patiently … for a week.
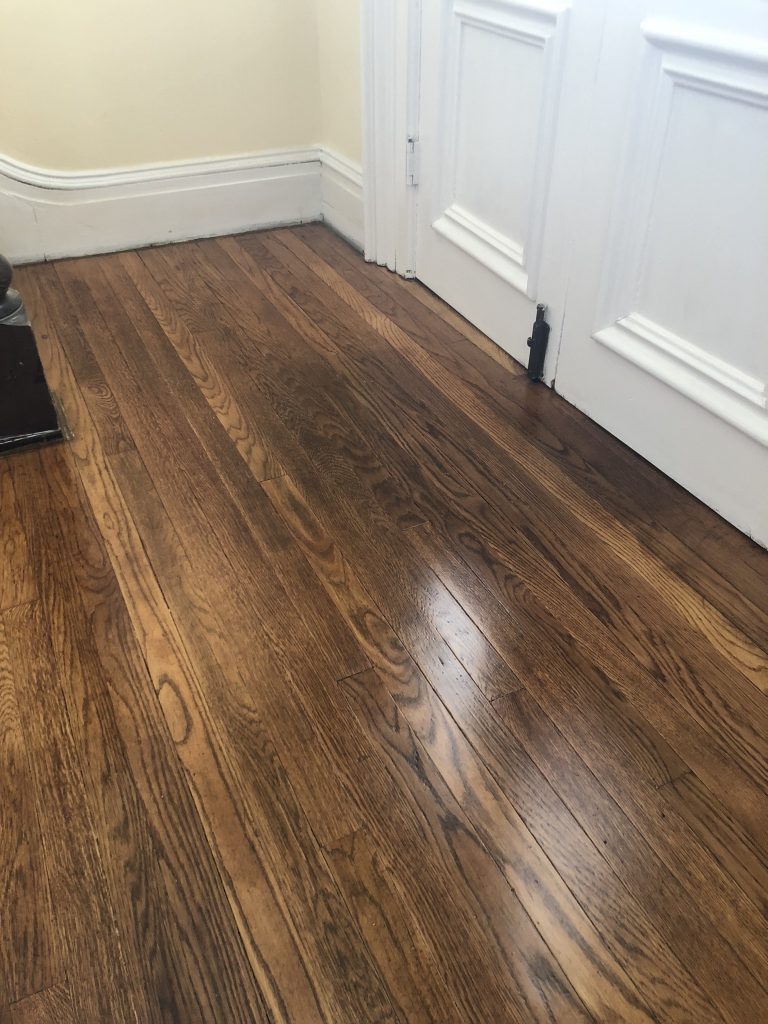
Sit back, look, and admire what you did.
Soft with a warm glow on the outside. Hard, impervious, and resilient on the inside.
A stain, a burn, a gouge each with it’s own story, not to be erased, only to be kept a secret by the floor. Character.
Like a raised scar from a fall on your bike many years ago, the stretch marks left after having a baby, a fading pain in your heart, as you remember … All received and born of us, a chapter in the book, a lesson learned … a foundation that has been built to be walked on for many years to come.
Thank you, my dear Kim. We laughed, we cried, we had a great week laboring over my floors.


